Important Keyword: Condonation Requests, e-Verify ITR, Income Tax Account, Income Tax Return.
Table of Contents
What is a Condonation Requests?
Taxpayers have the option to submit service requests through the e-filing portal, which offers two avenues for filing condonation requests:
Condonation of Delay for Late Submission of ITR-V:
This option applies if the ITR-V (Income Tax Return Verification) is submitted after 120 days of filing the ITR.
Condonation Request for Filing ITR after Expiry of Due Date:
This option is relevant for taxpayers who miss the deadline for filing their ITR and seek permission to submit it after the due date has passed.
After filing their Income Tax Return (ITR), individuals must verify it. The e-verification process should be completed within 120 days of filing. Failure to verify the ITR within this period results in it being considered invalid by the Income Tax Department (ITD). An invalid return indicates that the taxpayer has not effectively filed the ITR for a specific assessment year, requiring them to file it again.
Requirements:
Submission of Income Tax Return and ITR-V After 120 Days:
The Income Tax Return (ITR) and ITR-V should be submitted after 120 days from the filing of the return.
Failure to File ITR Before the End of the Relevant Assessment Year (AY):
In case of failure to file the Income Tax Return before the conclusion of the relevant Assessment Year (AY), a condonation request may be necessary.
Steps to File Condonation Requests on e-Filing Portal for Delay in Submission of ITR-V
Visit the e-Filing portal Visit the e-Filing Portal and login using valid credentials.
Select Condonation Request Click on Services > Condonation Request
Select the First Option Select the “Delay in Submission of ITR-V” option.
New Condonation Request Once you move to the next page, click on the create new condonation request option.
Select the appropriate record On the Select ITR page, select the record for which you want to raise a condonation request for delay in ITR-V submission and click Continue.
Provide a reason On the Provide reason for delay page, select the reason of your delay and click Submit.
Success Message A success message along with a Transaction ID is displayed. Please keep a note of the Transaction ID for future reference. You will also receive a confirmation message on the email ID and mobile number registered with e-Filing portal .
File Condonation Request for Filing ITR after Time-Barred
Login to the portal and click on Services > Condonation Request from the dashboard.
On the condonation request page, choose the second option “Allow ITR Filing after time-barred”
On the Filing after time-barred [u/s 119(2)(b)] page, click Create Condonation Request
Proceed to the next page and input the following details:
Select the appropriate Request Category, Assessment Year, ITR, Claim Value, Filing Type, Reason for Delay, and ITR Type from the available options.
Upload the JSON file of the Income Tax Return (ITR) for which you intend to submit the condonation of delay request. Click on the “Upload ITR” option to complete this step.
Provide supporting documents in PDF or XLS format by clicking on the “Upload Documents” option. Select the Document Description for each uploaded file. Note that a maximum of five files can be uploaded, with each file not exceeding 5 MB in size.
After successful submission, select your preferred option on the e-Verify page.
Important Keyword: Income Tax Account, Income Tax Website, TDS Form, View TDS.
Table of Contents
Income Tax e-Filing Portal: View TDS Form
Employers and organizations wield the authority to deduct Tax Deducted at Source (TDS) from employees’ incomes. Consequently, they possess the ability to verify the TDS forms filed on the Income Tax e-Filing portal. The TDS statement encompasses crucial details such as the Tax Deduction and Collection Account Number (TAN), Permanent Account Number (PAN) of dedicatees, particulars of tax paid to the government, and information regarding the TDS challan, among other requisite details as stipulated in the forms to be submitted. This comprehensive documentation ensures transparency and compliance with tax regulations, facilitating accurate reporting and deduction of taxes at the source.
Steps to view Filed Tax Deducted at Source Form
Visit the e-Filing portal Login to the e-Filing portal using valid credentials.
View Filed Tax Deducted at Source Form Click on e-File > Income Tax Forms > View Filed Forms
Tax Deducted at Source Forms Upon clicking on the option to view the filed forms, you will be redirected to the page showing the list of forms filed previously.
Important Keyword: CA, Income Tax Account, Tax Audit, Tax Audit Report.
Table of Contents
Accept / Reject Tax Audit Report on Income Tax e-Filing Portal
Exactly! Under Section 44AB of the Income Tax Act, if a taxpayer’s total income exceeds the specified threshold, they are required to undergo a tax audit conducted by a practicing Chartered Accountant. Once the tax audit is completed, the CA prepares and uploads the Tax Audit Report on the Income Tax e-Filing portal.
Subsequently, the taxpayer has the responsibility to review the Tax Audit Report and either accept or reject it. If accepted, the taxpayer can proceed to file their Income Tax Return based on the audited information. However, if the taxpayer rejects the report, they must provide reasons for rejection, and necessary revisions or amendments may be made accordingly. This process ensures compliance with tax regulations and facilitates accurate reporting of financial transactions to the tax authorities.
Steps to Accept / Reject Audit Report
An assessee needs to follow the below steps to accept/reject the Audit Report.
Login to Income Tax E-Filing Portal
Log in to the Income Tax E-Filing Portal using valid username and password.
Navigate to Pending Action
Click on Pending Action from the dashboard and select worklist from the drop-down.
Worklist dashboard
You can accept or reject the audit report from this dashboard.
Absolutely, once the taxpayer approves the audit report, the filing process is considered complete, and the report is forwarded for processing by the tax authorities. If the taxpayer rejects the report due to discrepancies or errors, the Chartered Accountant (CA) must rectify the issues and make the necessary changes to the audit form. Once the revisions are made, the CA uploads the corrected audit report again on the Income Tax e-Filing portal for the taxpayer’s review and approval. This iterative process ensures that accurate and compliant information is submitted to the tax authorities for assessment and verification.
Important Keyword: CA, Income Tax Account, Tax Audit, Tax Audit Report.
Table of Contents
Accept Appointment and Filing for Tax Audit Report
When it comes to audit report filing on the income tax portal, there are four important functions:
Taxpayer appoints practicing CA for Tax Audit: If a taxpayer falls under the purview of Section 44AB of the Income Tax Act and is thus liable for audit, they must appoint a practicing Chartered Accountant (CA) to conduct the tax audit. This CA will be responsible for preparing and uploading the Tax Audit Report on the Income Tax e-Filing portal.
CA accepts/rejects the appointment: Upon receiving the appointment, the CA has the option to accept or reject it. If accepted, the CA proceeds with the tax audit process. If rejected, the taxpayer must appoint another CA for the audit.
CA files the Tax Audit Report: Once the tax audit is completed, the CA files the Tax Audit Report on the Income Tax e-Filing portal. This report contains details of the taxpayer’s financial transactions, ensuring compliance with tax laws and regulations.
Taxpayer accepts/rejects Tax Audit Report: After the CA files the Tax Audit Report, the taxpayer has the opportunity to review it. The taxpayer can either accept or reject the report. If accepted, the audit process is considered complete, and the taxpayer can proceed to file the Income Tax Return. If rejected, the taxpayer must communicate the reasons for rejection to the CA for necessary revisions or amendments.
Steps to Accept and File Tax Audit Report on Income Tax E-Filing Portal
Login to Income Tax E-Filing Portal
Log in to income tax e-filing portal with valid username and password
View Worklist
Navigate to the profile and click on the worklist option.
Accept Option
Under the “For your action” section, click on the accept option for the form request.
File Form
Clicking on accept form would take you to the pending for filing section. Click on the option to file form.
Verify details
Verify the details presented on the screen and click on continue.
Upload filled forms
In the next window, upload the supporting documents such as balance sheet, profit & loss, cost audit, etc.
Important Keyword: Belated ITR, Income Tax Account, ITR Form, ITR Utility, Sec 139(4).
Table of Contents
How to file Belated Return u/s 139(4)?
A belated return, as defined under section 139(4) of the Income Tax Act, is a return filed by a taxpayer after the due date. Here are the methods through which belated returns can be filed:
File Belated Returns 139(4): Online on Income Tax Website
1. Login to your account on the income tax e-filing website.
Enter your user ID (PAN) and password and click on ‘Login’ on the income tax filing website.
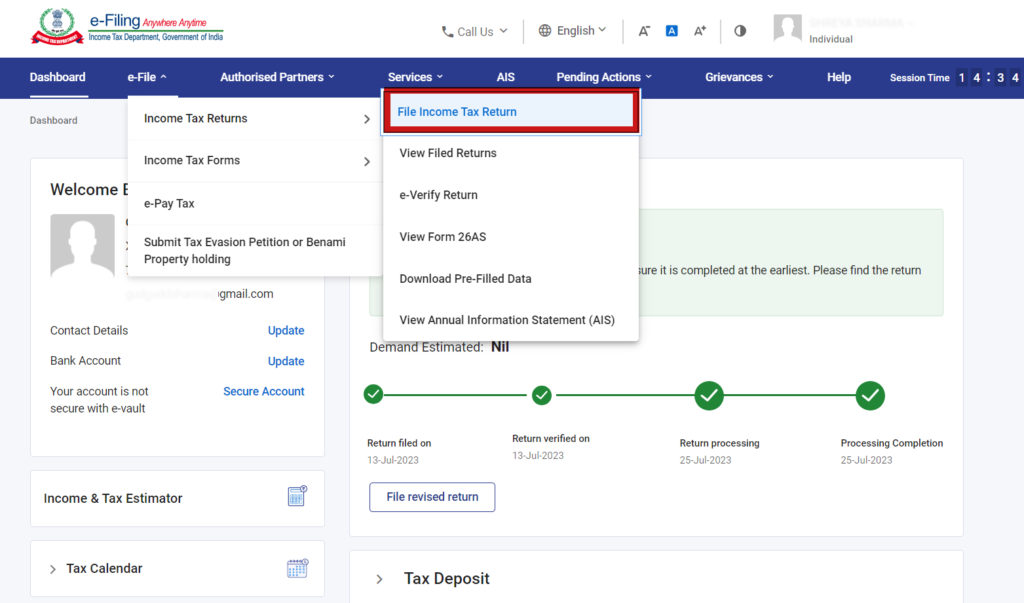
2. Navigate to File Income Tax Return
Click on e-File > Choose ‘Income Tax Returns and Select File Income Tax Return
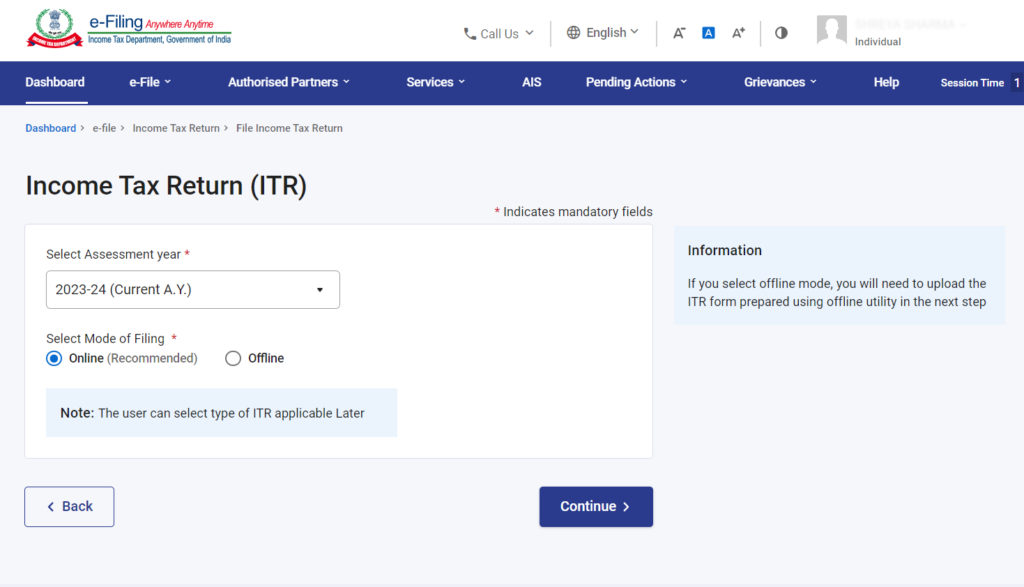
3. Enter the Assessment Year and Filing Mode.
Select the relevant AY for filing and online mode.
4. Select the Status Applicable
Select the status of filing.
5. Choose the ITR form Applicable
6. Click on the ‘Personal Information’ section and ensure all your personal details are correct.
7. Scroll down to the filing section and select 139(4).
8. Fill in all your income details under various source heads and proceed to make the tax payment and Submit the ITR.
File Belated Returns 139(4): Using ITR Preparation Utility
Download Offline ITR Preparation Utility and prepare the ITR. Once done, upload the .json file and proceed to verification.
Login to the filing Income Tax Website.
Navigate to E-file> Income Tax Return > File Income Tax Return.
Select the Relevant Assessment Year, Offline Mode of Filing, Filing Type as Section 139(4): Belated Return and Continue.
Attach the JSON file generated using Offline Utility and proceed to verification.